1.What is ADO.NET?
ADO.NET is the new database technology of the .NET (Dot Net) platform, and it builds on
Microsoft ActiveX® Data Objects (ADO).
ADO is a language-neutral object model that is the keystone of Microsoft's Universal Data Access strategy.
ADO.NET is an integral part of the .NET Compact Framework, providing access to relational data, XML documents, and application data.
ADO.NET
supports a variety of development needs. You can create database-client
applications and middle-tier business objects used by applications,
tools, languages or Internet browsers.
ADO.NET defines
DataSet and
DataTable
objects which are optimized for moving disconnected sets of data across
intranets and Internets, including through firewalls. It also includes
the traditional
Connection and
Command objects, as well as an object called a
DataReader that resembles a forward-only, read-only ADO
recordset. If you create a new application, your application requires some form of data access most of the time.
ADO.NET provides data access services in the Microsoft
.NET platform.
You can use
ADO.NET to access data by using the new .NET Framework data providers which are:
- Data Provider for SQL Server (
System.Data.SqlClient).
- Data Provider for OLEDB (
System.Data.OleDb).
- Data Provider for ODBC (
System.Data.Odbc).
- Data Provider for Oracle (
System.Data.OracleClient).
ADO.NET is a set of classes that expose data access services to the .NET developer. The
ADO.NET classes are found in
System.Data.dll and are integrated with the XML classes in
System.Xml.dll.
There are two central components of
ADO.NET classes: the
DataSet, and the
.NET Framework
Data Provider.
Data Provider is a set of components including:
- the Connection object (
SqlConnection, OleDbConnection, OdbcConnection, OracleConnection)
- the Command object (
SqlCommand, OleDbCommand, OdbcCommand, OracleCommand)
- the DataReader object (
SqlDataReader, OleDbDataReader, OdbcDataReader, OracleDataReader)
- and the DataAdapter object (
SqlDataAdapter, OleDbDataAdapter, OdbcDataAdapter, OracleDataAdapter).
DataSet object represents a disconnected cache of data which is made up of
DataTables and
DataRelations that represent the result of the command.
Before working with a database, you have to add (here) the
OleDb .NET Data Provider namespace, by placing the following at the start of your code module:
Hide Copy Code
using System.Data.OleDb;
Similarly for the
SqlClient .NET Data Provider namespace:
Hide Copy Code
using System.Data.SqlClient;
The
using statement should be positioned first in your code.
Now, we have to declare a connection string pointing to a MS Access database "
PersonDatabase.mdb".
Hide Copy Code
public string
  conString=@"Provider=Microsoft.Jet.OLEDB.4.0;" +
            @" DataSource=..\\..\\PersonDatabase.mdb";
The database should be in the specified path, otherwise you should change the path accordingly.
The next step is to create an
OleDbConnection object. We pass then the connection string to this
OleDbConnection object. You can code now to create a new
ADO.NET Connection object in order to connect to an OLE DB provider database.
Hide Copy Code
OleDbConnection con = new OleDbConnection(conString);
You can also explicitly reference declared objects if you don’t mind typing a lot.
Hide Copy Code
System.Data.OleDb.OleDbConnection con =
  new System.Data.OleDb.OleDbConnection(conString);
Here is the code snippet for connection to a database:
Hide Copy Code
using System.Data.OleDb;
public string conString=
@"Provider=Microsoft.Jet.OLEDB.4.0;Data Source=..\\..\\PersonDatabase.mdb";
OleDbConnection con = new OleDbConnection(conString);
con.Open();
In many earlier applications, the tendency was to open a connection
when you start the application and not close the connection until the
application terminates. It is an expensive and time-consuming operation
to open and close a database connection. Most databases have a limit on
the number of concurrent connections that they allow.
For example: each connection consumes a certain amount of resources on the database server and these resources are
not infinite. Most modern OLE DB providers (including SQL Server provider) implement
connection pooling.
If you create database connections, they are held in a pool. When you
want a connection for an application, the OLE DB provider extracts the
next available connection from the pool. When your application closes
the connection, it returns to the pool and makes itself available for
the next application that wants a connection.
This means that opening and closing a database connection is no
longer an expensive operation. If you close a connection, it does
not
mean you disconnect from the database. It just returns the connection
to the pool. If you open a connection, it means it's simply a matter of
obtaining an already open connection from the pool. It's recommended in
many
ADO.NET books
not to keep the connections longer than you need to. Therefore, you should:
- Open a connection when you need it, and
- Close it as soon as you have finished with it.
For example: here is another way to get a connection to a database:
Hide Copy Code
private SqlConnection con = null;
private string constr ="Integrated Security=SSPI;" +
"Initial Catalog=Northwind;" +
"Data Source=SONY\\MYSQLSERVER;";
private void fnGetConnection()
{
try
{
con = new SqlConnection(constr);
con.Open();
}catch (Exception ex) {
MessageBox.Show("Error in connection : "+ex.Message);
}finally {
if (con != null)
con.Close();
}
}
For example: you want to open the connection, fill the
DataSet, and close the connection. If the connection fails, you want to get the error message.
Hide Copy Code
try
{
  con.Open();
  dadapter.Fill(dataset1);
  con.Close();
} catch (Exception ex) {
   MessageBox.Show("Error in retrieving data: " + ex.Message);
}
For example: if you want to save the data you changed, then you just
open the connection, update the data, and close the connection and
accept the changes. If it fails, display an error message, reject the
changes, and close the connection.
Hide Copy Code
try
{
  DataSet changes = dataset.GetChanges();
  con.Open();
  datapter.Update(changes);
  con.Close();
  dataset1.AcceptChanges();
}catch (Exception ex) {
  MessageBox.Show("ErrorR: " + ex.Message);
  dataset1.RejectChanges();
  con.Close();
}
3. DataSet
The
DataSet is similar to an array of disconnected
Recordset
objects. It supports disconnected data access and operations, allowing
greater scalability because you no longer have to be connected to the
database all the time.
DataSet is a copy of an extracted data being downloaded and cached in the client system.
The
DataSet object is made up of two objects:
DataTableCollection object containing null or multiple DataTable objects (Columns, Rows, Constraints).
DataRelationCollection object containing null or multiple DataRelation objects which establish a parent/child relation between two DataTable objects.
Hide Copy Code
DataSet dset =
new DataSet();
There are two types of
DataSets:
- Typed DataSet
- Untyped DataSet
1. Typed DataSet is derived from the base
DataSet class and then uses information in an XML Schema file (
.xsd
file) in order to generate a new class. Information from the schema
(tables, columns, and so on) is generated and compiled into this new
DataSet class as a set of first-class objects and properties.
Typed dataset
is easier to read. It's also supported by IntelliSense in the Visual
Studio Code Editor. At compile time, it has type checking so that there
are less errors in assigning values to
DataSet members. Therefore, using
Typed DataSet has many advantages.
Example: the following code accesses the
CustomerID column in the first row of the
Customers table.
Hide Copy Code
string str;
str=dset.Customers[
0].CustomerID;
Create a typed DataSet without designer - manually
- Call the command prompt (cmd) at the location of the XSD schema file.
- Use the XSD.EXE utility to create the class for the typed
DataSet.
Hide Copy Code
xsd.exe /d /l:cs mydataset.xsd /n:mynamespace
/d : you create a DataSet.
/l:cs - set the language as C#.
/n:mynamespace - the class should use the namespace "mynamespace".
The output of
XSD.EXE with these arguments will be a
.cs class file (
mydataset.cs).
Use
csc.exe to compile the class.
Hide Copy Code
csc.exe /t:library mydataset.cs /r:System.dll /r:System.Data.dll
/r:System.XML.dll /out:bin/mydataset.dll /t:library
Compile as a library component (DLL).
- /r: - specifies assemblies you need to reference.
- /out: - saves the compiled assembly in the bin subdirectory of the current directory.
2. Untyped DataSet is not defined by a schema, instead, you
have to add tables, columns and other elements to it yourself, either by
setting properties at design time or by adding them at run time.
Typical scenario: if you don't know in advance what the structure of
your program is that is interacting with a component that returns a
DataSet.
The equivalent code above for
Untyped DataSet is:
Hide Copy Code
string str;
str=(
string)dset.Tables[
"Customers"].Row[
0].[
"CustomerID"];
A
DataSet is a container; therefore, you have to fill it with data.
You can populate a DataSet in a variety of ways:
- by using DataAdapter objects and Fill method.
For example:
Hide Copy Code
string strCon = @"Data Source=SONY\MYSQLSERVER;" +
  "Initial Catalog=Northwind;Integrated Security=SSPI";
  string strSql="select * from customers";
  SqlConnection con=new SqlConnection(strCon);
  con.Open();

  SqlDataAdapter dadapter=new SqlDataAdapter();
  dadapter.SelectCommand=new SqlCommand(strSql,con);
  DataSet dset=new DataSet();
  dadapter.Fill(dset);
  con.Close();

  this.dataGrid1.DataSource=dset;
- by creating DataTable, DataColumn and DataRow objects programmatically.
After you create a
DataTable and define its structure using columns and constraints, you can add new rows of data to the table.
For example:
Hide Copy Code
DataSet dset;
DataTable dtbl;
DataRow drow;
drow=dtbl.NewRow();
drow["LastName"]="Altindag";
drow[1]="Altindag";
dtbl.Rows.Add(drow);
dtbl.Rows.Add(new object[] {1, "Altindag"});
- Read an XML document or stream into the DataSet.
The following code creates a
SqlConnection object that opens a connection to the Pubs database, creates a SQL query to get the data of the Authors table as XML, and it creates a new SqlCommand object. After creating a new DataSet, it uses the ExecuteXmlReader method to pass an XmlReader object to the DataSet's ReadXml method, which allows the DataSet to populate itself from the XmlReader. Finally, the code sets the DocumentContent property to the result of the GetXml method of the DataSet. XML uses the XSL Transformation document authors.xsl (included in the project) to format the XML content displayed by the XML control.
For example:
Hide Copy Code
protected System.Web.UI.WebControls.Xml XmlDisplay;

string strCon = @"Data Source=SONY\MYSQLSERVER;" +
"Initial Catalog=pubs;Integrated Security=SSPI";
SqlConnection con=new SqlConnection(strCon);

con.Open();
try
{
  string strSql="select * from FROM authors FOR XML AUTO, XMLDATA";
  SqlCommand cmd=new SqlCommand(strSql, con);
  DataSet dset=new DataSet();
  dset.ReadXml(cmd.ExecuteXmlReader(),XmlReadMode.Fragment);
  XmlDisplay.DocumentContent = dset.GetXml();
}finally {
  con.Close();
}
- Merge (copy) the contents of another DataSet, with the Merge method.
You can merge two
DataSet objects that have largely
similar schemas. You can use a merge typically on a client application
to incorporate the latest changes from a data source into an existing DataSet. This allows the client application to have a refreshed DataSet with the latest data from the data source.
For example:
Hide Copy Code
dataset1.Merge(dataset2);
top
4. DataAdapter
DataAdapter object is like a bridge that links the database and a Connection object with the
ADO.NET-managed
DataSet object through its
SELECT and action query Commands. It specifies what data to move into and out of the
DataSet.
Often, this takes the form of references to SQL statements or stored
procedures that are invoked to read or write to a database.
The
DataAdapter provides four properties that allow us to control how updates are made to the server:
SelectCommand
UpdateCommand
InsertCommand
DeleteCommand
The four properties are set to Command objects that are used when data is manipulated.
The
DataAdapter includes three main methods:
Fill (populates a DataSet with data).
FillSchema (queries the database for schema information that is necessary to update).
Update (to change the database, DataAdapter calls the DeleteCommand, the InsertCommand and the UpdateCommand properties).
For example:
When we call the
DataAdapter's
Fill method to retrieve data from a data source and pour it into a
DataSet, the Command object in the
SelectCommand property is used. The
DataAdapter is the gatekeeper that sits between our
DataSet and the data source.
Hide Copy Code
OleDbDataAdapter
dAdapter =
new
OleDbDataAdapter (
"select * from PersonTable", con );
dAdapter.Fill(dSet,
"PersonTable");
Here is the method used in this project to get a data connection,
DataSet and
DataAdapter. You can find this method in the file "
DataAccessTierClass.cs".
Hide Copy Code
public bool fnGetDataConnection()
{
try {
con =
new OleDbConnection(conString);
dAdapter=
new OleDbDataAdapter(
"select * from PersonTable", con);
dSet=
new DataSet();
dAdapter.Fill(dSet,
"PersonTable");
}
catch(Exception ex) {
MessageBox.Show(
"Error : "+ex.Message);
return false;
}
return true;
}
top
5. Display data in a DataGrid / data relationship between two tables
The Windows Forms
DataGrid control displays data in a series of rows and columns. The Windows Forms
DataGrid control provides a user interface to
ADO.NET DataSets. It displays tabular data and allows for updates to the data source. When you set a
DataGrid
control to a valid data source, the control will be automatically
populated, creating columns and rows based on the shape of the data.
You can use the
DataGrid control for displaying either a
single table or the hierarchical relationships between a set of tables.
If you want to work with the
DataGrid control,
DataGrid should be bound to a data source by using:
- the
DataSource and DataMember properties at design time or
- the
SetDataBinding method at run time.
Here is the binding to the
DataGrid control with
DataSet I used in this project:
Hide Copy Code
this.dataGrid1 DataSource = datc.dSet.Tables[
"PersonTable"];
You can only show one table in the
DataGrid at a time.
If you define a
parent-child relationship between tables, you can navigate between the related tables to select the table you want to display in the
DataGrid control.
For example:
Hide Copy Code
dset.Relations.Add(
"CustomerOrders",
dset.Tables[
"customers"].Columns[
"CustomerID"],
dset.Tables[
"orders"].Columns[
"CustomerID"]);
this.dataGrid1.DataSource=dset.Tables[
"customers"];
OR
Hide Copy Code
this.dataGrid1.SetDataBinding(dset,
"customers");
customers: Parent table
orders: Child table
CustomerID in Orders is a foreign key referring to CustomerID primary key in Customers table.
Here is a typical example of how to use the parent-child relationship between the tables "Customers" and "Orders" on a
DataGrid control.
The
DataRelation in this example allows you to navigate from one
DataTable ("Customers") to another
DataTable ("Orders") within a
DataSet. The
DataSet class can contain null or many
DataTable objects. "Customers" and "Orders"
DataTables contain a column named "
CustID", which is a link between these two
DataTable objects.
To run and test this example, create a new project, drag/drop a
Button (here:
button1) and a
DataGrid (here:
dataGrid1) on the
Form and copy the following code snippets (
fnGetConnectionString(),
button1_Click) and you additionally need SQL Server 2000 running or MS-Access.
Hide Copy Code
public string fnGetConnectionString()
{
return "data source=SONY\\MYSQLSERVER;initial" +
" catalog=Northwind;integrated security=SSPI;";
}
Hide Shrink  Copy Code
private void button1_Click(
object sender, System.EventArgs e)
{
DataSet dset=
new DataSet();
string strCustomers=
"select * from customers";
string strOrders=
"select * from orders";
SqlConnection sqlcon=
new SqlConnection(fnGetConnectionString());
SqlDataAdapter dadapter=
new SqlDataAdapter(strCustomers,sqlcon);
dadapter.Fill(dset,
"Customers");
dadapter=
new SqlDataAdapter(strOrders,sqlcon);
dadapter.Fill(dset,
"Orders");
dset.Relations.Add(
"Customer Orders",
dset.Tables[
"Customers"].Columns[
"CustomerID"],
dset.Tables[
"Orders"].Columns[
"CustomerID"]);
this.dataGrid1.DataSource=dset.Tables[
"Customers"];
}
Now if you
update the data in the bound
DataSet through any mechanism, the
DataGrid control reflects the changes. You can update the data in the
DataSet through the
DataGrid control, if the
DataGrid and its table styles and column styles have the
ReadOnly property set to
false. There are four most typical valid data sources for the
DataGrid:
DataTable class
DataView class
DataSet class
DataViewManager class
The first time this application was published, I got e-mails from users asking me how to get the contents of a
DataGrid cell you clicked, or how to get the
DataGrid row contents you clicked. So now, I've one method to do that and didn't want to withhold it from you.
Hide Shrink Copy Code
private void dataGrid1_CurrentCellChanged(
object sender, System.EventArgs e)
{
int iRownr=
this.dataGrid1.CurrentCell.RowNumber;
int iColnr=
this.dataGrid1.CurrentCell.ColumnNumber;
object cellvalue1=
this.dataGrid1[iRownr, iColnr];
object cellvalue2=
null;
try {
cellvalue2=
this.dataGrid1[iRownr, iColnr+1];
this.textBox1.Text=cellvalue1.ToString()+
" "+cellvalue2.ToString();
}
catch(Exception ex) {
MessageBox.Show(
"No further columns after the last " +
"column(Country) -->> "+ex.Message,
"STOP");
cellvalue2=
this.dataGrid1[iRownr, iColnr-1];
this.textBox1.Text=cellvalue2.ToString()+
" "+cellvalue1.ToString();
}
}
top
6. DataBindings for TextBoxes
DataBinding is the ability to bind some elements of a data source with some graphical elements of an application.
The data in Windows Forms is bound by calling
DataBindings. Windows Forms allows you to bind easily to almost any structure that contains data.
Windows Forms Controls support two types of data binding:
- Simple Data Binding
- Complex Data Binding
1. Simple Data Binding allows you to display a single data element, such as a column value from a
DataSet table, in a control. You can simple-bind any property of a control to a data value.
Simple Data Binding can be performed either at design time using
DataBindings property of a control
or dynamically at run time. This is the type of binding typical for controls such as a
TextBox control or
Label control that displays typically only a single value.
For example:
Hide Copy Code
textBox1.DataBindings.Add(
"Text", dataset,
"studentTable.studentID");
The control "
textBox1" above is bound to the "
studentID" column of a table "
studentTable" on the
DataSet (
dataset) through the
BindingContext object.
2. Complex data binding is the ability of a control to bind to
more than one data element, typically more than one record in a
database, or to more than one of any other type of bindable data
element.
DataGrid,
ListBox and
ErrorProvider controls support
complex data binding.
Typical scenario:
You want to display the names of products in a list box and then retrieve in a
TextBox the
ProductID of a product which you selected.
example:
You could add
complex data binding by using the
DataSource and
DataMember properties.
Hide Copy Code
datagrid1.DataSource = dSet;
datagrid1.DataMember = "PersonTable";
Here is the method used in this project to bind all
TextBoxes:
Hide Copy Code
private void fnGetDataBindingForTextBoxes()
{
  this.textboxFirstname.DataBindings.Add("Text",
          datc.dSet.Tables["PersonTable"],"FirstName");
  this.textboxLastname.DataBindings.Add("Text",
          datc.dSet.Tables["PersonTable"],"LastName");
  this.textboxTitle.DataBindings.Add("Text",
          datc.dSet.Tables["PersonTable"],"Title");
  this.textboxCity.DataBindings.Add("Text",
          datc.dSet.Tables["PersonTable"],"City");
  this.textboxCountry.DataBindings.Add("Text",
          datc.dSet.Tables["PersonTable"],"Country");
}
top
7. Using the CurrencyManager
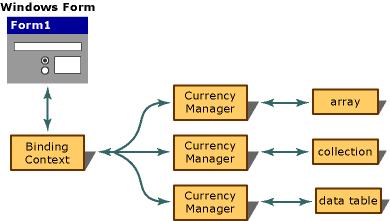
You use the
CurrencyManager object if you want to keep
data-bound controls synchronized with each other which means showing
data from the same record. For example: if you want to add a
TextBox control to a form and bind it to a column of a table (e.g.,
Customers.FirstName) in a
DataSet (e.g.,
dSet), the control is going to communicate with the
BindingContext object for this form. In turn, the
BindingContext object is going to talk to the specific
CurrencyManager object for the data the
TextBox control is binding.
Every Windows Form has a
BindingContext object keeping track of all the
CurrencyManager objects on the Windows Form.
CurrencyManager keeps track of the position in the data source. When you bind a data object to a control (i.e.,
TextBox), a
CurrencyManager object is automatically assigned. If you bind several controls to the same data source, they share the same
CurrencyManager.
In a normal case where you are using an
ADO.NET database (connecting and closing database) and displaying the records, e.g., in a
DataGrid, you never need the
CurrencyManager object.
But if you want to know the exact position within a data structure (e.g., table in your database) as I did, you have to use the
CurrencyManager object because the
CurrencyManager has the
Position property for this purpose. You can, for example, manipulate the
Position property in a Next or Previous or First or Last button which I did in my program as well.
For example:
If you want to know how many records are in a
DataTable, you simply query the
BindingContext object's
Count property.
Hide Copy Code
this.BindingContext[dataset1,"PersonTable"].Count - 1 ;
If you want to get the current position from the
BindingContext object:
Hide Copy Code
this.BindingContext[dataset1, "PersonTable"].Position + 1;
After data binding, you call and initialize
CurrencyManager for your table. Here is the method I used to initialize the
CurrencyManager for the table
"PersonTable":
Hide Copy Code
public void fnSetCurrencyManager()
{
  currManager = (CurrencyManager)this.
  BindingContext [ datc.dSet.Tables["PersonTable"]] ;
}
top
8. Navigation through records with Next, Previous, Last, First buttons
As soon as you get the data populated in the
DataGrid, you can navigate through records by using Next, Previous, Last, First buttons, or by clicking the rows of the
DataGrid, or by using the arrow keys (Up arrow and Down arrow).
If the
DataGrid is currently displaying data, none of
the standard keyboard events are raised for the navigation keys. You can
still use Up and Down arrow keys to navigate in the
DataGrid but, because I haven't implemented it, you
don't get the record position in the
StatusBar.
In order to capture keystrokes on the
DataGrid, you have to override the
ProcessCmdKey method that processes a command key. You can find this method in section 9.
I also included two new methods in order to highlight the records in the
DataGrid by using Next, Previous, Last or First buttons because you don't normally get the row highlighted in the
DataGrid if you click such a button. By default, if you click the
DataGrid row, the row will be highlighted with
BackColor and
ForeColor.
1st method:
Hide Copy Code
fnSelectUnselectLastFirstRow(int posi)
If you click First or Last button, the first or last record will be selected and highlighted in the
DataGrid. You invoke for that the
fnSelectUnselectLastFirstRow() method and pass as parameter 0 (zero) for the first record (
fnSelectUnselectLastFirstRow(0);),
and (this.currManager.Count-1) for the last record.
Hide Copy Code
fnSelectUnselectLastFirstRow(this.currManager.Count-1);
Here is the 1
st method I used for this purpose:
Hide Copy Code
private void fnSelectUnselectLastFirstRow (int posi)
{
this.dataGrid1.UnSelect(this.dataGrid1.CurrentRowIndex);
this.dataGrid1.Select(posi);
}
2nd method:
Hide Copy Code
fnSelectUnselectCurrentRow(int num1, int num2)
If you click Next or Previous button, the next or previous record will be selected and highlighted in the
DataGrid. You call for that the method
fnSelectUnselectCurrentRow(); and pass as parameter (1,-1) for the next record (
fnSelectUnselectCurrentRow(1,-1);),
or (-1,1) for the previous record (
fnSelectUnselectCurrentRow(-1,1);).
Here is the 2
nd method used for it:
Hide Copy Code
private void fnSelectUnselectCurrentRow(int num1, int num2)
{
this.iRowIndex=this.dataGrid1.CurrentRowIndex;
this.iRowIndex=this.iRowIndex+num1;
this.dataGrid1.Select(this.iRowIndex);
this.iRowIndex=this.iRowIndex+num2;
this.dataGrid1.UnSelect(this.iRowIndex);
}
Now back to enabling and disabling the buttons:
When you click
First button, position will be set to 0 (zero) because the first row starts by zero.
Hide Copy Code
currManager.Position=0;
and
- Disable First and Previous buttons because there is no previous record in the data source.
- Enable Next and Last buttons because there are records forwards.
When you click
Next button, position in the data is increased by 1 and moved to the next row.
Hide Copy Code
currManager.Position +=1;
and
- Enable First and Previous buttons as long as there are forward records.
- Otherwise, disable Next and Last buttons which means you reached the end of the records.
When you click
Previous button, position in the data is decreased by -1 and moved to the previous row.
Hide Copy Code
currManager.Position -=1;
and
- Enable Next and Last buttons as long as there are records backwards.
- Otherwise, disable First and Previous buttons which means you reached the beginning of the records.
When you click
Last button, position in the data is set to the last record (row).
Hide Copy Code
this.currManager.Position=this.currManager.Count-1;
and
- Disable Next and Last buttons because there are no records forwards any more.
- Otherwise, enable First and Previous buttons so that you can navigate backwards.
To enable and disable the buttons, I use the function/method
fnEnableDisableButtons with four parameters (two
Buttons,
string for
StatusBar,
bool for
true=enabling,
false=disabling).
Hide Copy Code
private void fnEnableDisableButtons(Button bt1, Button bt2, string str, bool b)
{
  bt1.Enabled=b;
  bt2.Enabled=b;
  this.statusBar1.Text=str;
}
top
9. How to trap keystrokes (Up, Down, Esc, NumLock...) in the DataGrid
Every time you press the keys Up, Down, NumLock and Esc in the
DataGrid, I display text in the
statusBarPanel1 and
statusBarPanel2, but you don't get record numbers displayed because I thought it would be a bit confusing and too much coding.
Like many users, I also looked for a method to catch the keystrokes in a
DataGrid,
and encountered it first in MSDN Library. So I decided to include it in
the code so that users can make use of it. For most purposes, the
standard
KeyUp,
KeyDown, and
KeyPress events can capture and handle keystrokes. However, not all controls raise the standard
KeyUp,
KeyDown events for all keystrokes under all conditions. The
DataGrid control is one of them.
If no data was assigned to the grid, the arrow keys (LEFT, RIGHT, UP, and DOWN) raise only the
KeyUp event. If the
DataGrid displays data, none of the standard keyboard events are raised for the navigation keys. The
DataGrid
is the control for which this feature is most frequently requested. You
also can intercept key combinations, including CTRL and ALT. This
technique does not capture the Print Screen key. In order to trap
keystrokes in a Windows Forms control, you can override the
ProcessCmdKey method in which I changed only
StatusBarPanel Text.
Hide Shrink Copy Code
protected override bool ProcessCmdKey(ref Message msg, Keys keyData)
{
const int WM_KEYDOWN = 0x100;
const int WM_SYSKEYDOWN = 0x104;
if ((msg.Msg == WM_KEYDOWN) || (msg.Msg == WM_SYSKEYDOWN))
{
switch(keyData)
{
case Keys.Down:
this.statusBarPanel2.Text="Down";
this.statusBarPanel1.Text = "Trapped keystrokes on DataGrid...";
break;
case Keys.Up:
this.statusBarPanel2.Text="Up";
this.statusBarPanel1.Text ="Trapped keystrokes on DataGrid...";
break;
case Keys.NumLock:
this.statusBarPanel2.Text="NumLock";
this.statusBarPanel1.Text ="Trapped keystrokes on DataGrid...";
break;
case Keys.Escape:
this.statusBarPanel2.Text="Escape";
this.statusBarPanel1.Text ="Trapped keystrokes on DataGrid...";
ExitClass ec=new ExitClass();
ec.fnExitUniversal();
break;
}
}
return base.ProcessCmdKey(ref msg,keyData);
}