it is pretty much simple, ake a look at this controller function and if you dont understand it, just drop a comment and will send you the whole source code.
public function insertproduct(Request $request){ $data=$request->all(); $file=$request->file('image'); // dd($request);
hi guys, i am going to demonstrate how to send emails from your website via php. step1. create a html file and name it as you desire then paste the following code:
Thank you forcontacting us. We will be in touch with you very soon.
<?php
}
?>
for more details on setting up your php environment, drop your email as comment and i shall send you a complete simplified booklet by wesys solutions for free.
using System; using System.Collections.Generic; using System.ComponentModel; using System.Data; using System.Drawing; using System.Linq; using System.Text; using System.Windows.Forms; using WhatsApp_Application; using WhatsAppApi; namespace WhatsApp_Application { public partial class Form1 : Form { public Form1() { InitializeComponent(); }
private void btn_send_Click(object sender, EventArgs e) { string from = "9199876543210"; //(Enter Your Mobile Number) string to = txt_to.Text; string msg = txt_msg.Text; WhatsApp wa = new WhatsApp(from, "WhatsAppPassword", "NickName", false, false); wa.OnConnectSuccess += () => { MessageBox.Show("Connected to WhatsApp..."); wa.OnLoginSuccess += (phonenumber, data) => { wa.SendMessage(to, msg); MessageBox.Show("Message Sent..."); }; wa.OnLoginFailed += (data) => { MessageBox.Show("Login Failed : {0} : ", data); };
I began this series on scripting awhile back to teach all aspiring hackers how to write some basic scripts for hacking and reconnaissance.
Without developing some basic scripting skills, the aspiring hacker
will be condemned to the realm of the script kiddie. This means that you
will be limited to using tools developed by someone else, which
decreases your probability of success and increases your probability of
detection by antivirus (AV) software, intrusion detection systems (IDS), and law enforcement. With some scripting skills, you can elevate to the upper echelon of professional hackers!
In my previous scripting tutorials, I've covered BASH, Perl and PowerShell scripting, and along the way, we built our own network port scanner using Perl. Here we will begin looking at the most widely used scripting language for hackers, Python.
Python
has some important features that make it particularly useful for
hacking, but probably most importantly, it has some pre-built libraries
that provide some powerful functionality. Python ships with over 1,000
modules and many more are available in various other repositories. This
isn't to say that scripting languages like BASH, Perl, and Ruby can't do
the same things as Python, but building those capabilities are much
easier using Python.
Adding Python Modules
The
Python standard library and modules provide an extensive range of
capabilities including built-in data types, exception handling, numeric
and math modules, file handling, cryptographic services, Internet data
handling, and interaction with Internet protocols (IPs).
Despite
all of the power offered by these standard libraries and modules, we
may need or want additional third-party modules. The third-party modules
available for Python are extensive and is probably the reason most
hackers prefer Python for scripting. You can find a comprehensive list
of third-party modules at PyPI: The Python Package Index.
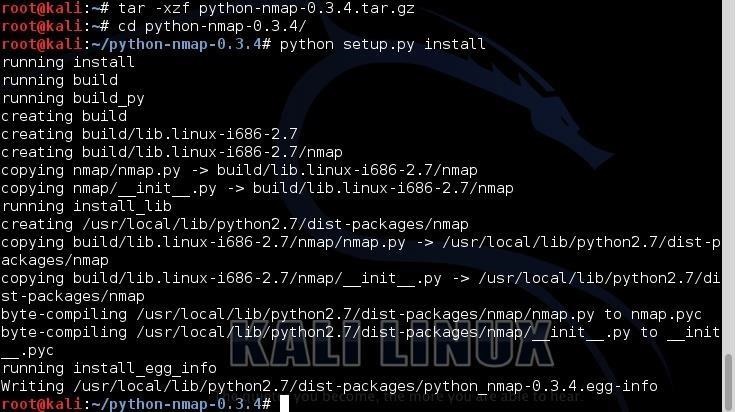
If we need to install a third-party module, we can simply use wget to download it from the repository, uncompress the module, then run the python setup.py install command. As an example, let's download and install the Nmap python module from a small repository at xael.org.
After we have downloaded the new module, we need to uncompress it with tar: kali > tar -xzf python-nmap-0.3.4.tar.gz
Then, change directories to the newly created directory: kali > cd python-nmap-.03.4/
Finally, we need to install the new module by typing:
kali > python setup.py install
Now that we have installed this Nmap module, it will be available to us for use in a later tutorial.
Getting Started Scripting with Python
Now
that know how to install modules in Python, I want to cover some of the
basic concepts and terminology of Python, then the basic syntax, and
finally, we will write some scripts that will be useful to hackers
everywhere, which will demonstrate the power of Python.
Like the other scripting languages we have explored, we can create our script in any text editor. I'll be using the built-in GUI text editor in Kali, Leafpad, but you can use whichever text editor you prefer.
Formatting
Unlike
some of the other scripting languages, formatting is very important in
Python. The Python interpreter uses the formatting to determine how code
is grouped together. The particulars of the formatting are less
important than being consistent. So, if you have a group of code that
you start with double indentation, you must be consistent with the
double indentation for Python to recognize that the code belongs
together. This is different from scripting in other programming
languages where formatting is optional and best practice, but not
required.
Running Python Files
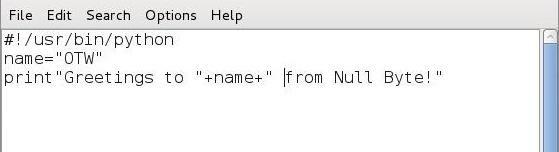
To become familiar with the basics of running Python files, let's create a simple script in Leafpad and save it as greetings.py.
#! /usr/bin/python name="<your name>' print "Greetings to " + name + " from Null Byte!"
The
first line simply tells our system that we want to use the Python
interpreter. The second line defines a variable "name" and assigns a
value to it, in this case "your name." Note that I put in my name,
"OTW." The third line then creates a print statement concatenating
"Greetings to" with the value in the name variable to "from Null Byte!"
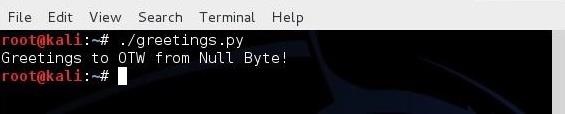
Now, before we can run this script, we need to give ourselves permission to execute it. We need the chmod command to do that. (For more information on Linux permissions, see this article.)
kali > chmod 755 greetings.py
When we run this simple script, we get:
Comments
Like
any programming and scripting language, Python has the capability of
adding comments. Comments are simply words, sentences, and even
paragraphs that explain what the code is meant to do. Although comments
are not required, it sure is helpful when you come back to it two years
later and can't remember what that script was meant to do.
Comments
are not seen by the interpreter. This mean that any line designated a
comment is skipped by the interpreter until it comes to a legitimate
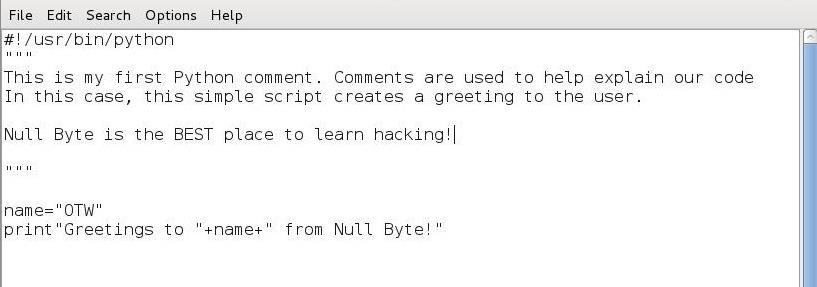
line of code. As with many other languages, Python uses the # at the start of a line to designate that single line as a comment. If we want to write multi-line comments, we can use three double quotation marks (""").
As you can see in the screenshot below, I have added a short multi-line comment to our simple greeting.py script.
When
we execute it again, nothing changes. It runs exactly the same, but now
we have some info about our script when we return to it at a later
time.
Modules
Python
allows us to group our code into modules. If we want to use a module,
we need to "import" it. When we import a module, we then gain access to
all of the classes, class methods, and functions (don't worry if you
don't understand this. I'll try to explain it in my next tutorial on
Python) that were created in the module. These modules are one of the
key features that makes Python so powerful for the hacker.
These
are the very basics of the Python scripting language. In our second
guide on Python scripting, we will add variables, lists, arguments,
dictionaries, control statements, functions, and exception handling
working towards developing some simple, but valuable hacking scripts, so
keep coming back, my greenhorn hacker!
You
will notice above there are two connection strings one for Excel 97 –
2003 format which uses Microsoft Jet driver and another one is for Excel
2007 format which uses Microsoft Ace driver.
I
have used Placeholders for Data Source {0} and the HDR {1} property so
that I can easily replace fill it in the front end based on the Excel
File Selected and the Headers property selected by the user through the
checkbox respectivey
Front End design
The
front end design of the web page contains a FileUpload Control, a
Button which will be used to upload the Excel File, RadioButtonList for
the user to select whether headers are present or not by default Yes is
selected and finally the GridView control in which I have set
AllowPaging property to true.
Next
comes the part to upload the file and reading it. As you will notice in
the aspx I have added OnClick event handler to the Upload button which
will be triggered when the upload button is clicked
When
the upload button is clicked the uploaded File is saved to a Folder
whose path is defined in the App Settings section in the Web.Config
using the following key
code snippet;
<appSettings>
<addkey ="FolderPath"value ="Files/"/>
</appSettings >
Once
the File is saved in the folder the Import_To_Grid method is called up
which is described later. Below is the code snippet for the Upload
button event handler
Now
the saved Excel file is read using OLEDB. Based on the extension I
decide the driver to be used in order to read the excel file and also
whether Excel will be read along with header row or not based on the
RadioButtonList. All these values are filled in the placeholders of the
connection string.
After
that I read the schema of the Excel Workbook in order to find out the
Sheet Name of the first sheet. Once I get that I fire a select query on
the first Excel sheet and fill a datatable which is then passed to the
GridView as data source. You can refer the complete function below